6 Quick Tour with Visual Basic
This quick tour is designed to get you started with Oracle Objects for OLE for Visual Basic. An example application, the employee database application, demonstrates how to program basic database operations, such as navigating through data and, adding, modifying, and querying records. A more advanced section demonstrates how to perform batch inserts using parameter arrays and SQL statement objects. This quick tour and example application assume that the Scott/Tiger schema is installed.
See Also:
"Demonstration Schema and Code Examples"The entire code for this example application is provided in the ORACLE_BASE\\ORACLE_HOME\OO4O\VB\SAMPLES\QT\ directory.
This quick tour covers the following topics:
Introduction
This section introduces the employee database application and the two Visual Basic forms that users interact with to use the application.
About the Employee Database Application
The employee database application lets the user do the following:
-
Browse through data
-
Add records
-
Update records
-
Query the database
-
Add records in a batch operation
To provide these functions, this example uses the following forms:
Employee Form
The Employee Form displays the fields of the database EMP table and has functional buttons that allow the user to browse, add, update, and query records.
Figure 6-1 shows the Employee Form.

See Also:
-
"Completed Sample Form_Load Procedure" for the code for the
Form_Loadprocedure that initializes the Employee Form -
"Programming a Data Entry Form" for a detailed description of the Employee Form and code for the navigational buttons
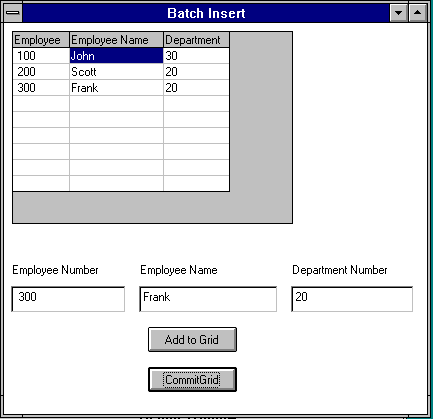
Batch Insert Form
The Batch Insert Form allows users to enter records in a batch operation.
See Also:
"Programming a Batch Form" for a detailed description of the Batch Insert Form and code for its commandsFigure 6-2 shows the Batch Insert Form.
Getting Started: Steps to Accessing Oracle Data
Before server data can be manipulated, the application must accomplish the four steps that are described in this section. Sample code for this example is provided in "Completed Sample Form_Load Procedure".
-
Start the Oracle In-Process Automation Server.
The Oracle In-Process Server (OIP) provides the interface between the Visual Basic application and Oracle Database. To start the Oracle In-Process Server, you must create an
OraSessionobject using the Visual BasicCreateObject()function, as follows:Set OraSession = CreateObject("OracleInProcServer.XOraSession")When creating the
OraSessionobject, the argument supplied to theCreateObject()function must always beOracleInProcServer.XOraSession. The left side of the argument defines the application name as registered in your system, in this case,OracleInProcServer. The right side identifies the type of object to create, in this case, theXOraSessionobject. Executing this command starts the Oracle In-Process Server. -
Connect to Oracle Database.
After the OIP server is running, you can connect to a local or remote Oracle database. To do so, you must create the
OraDatabaseobject as follows:Set OraDatabase = OraSession.OpenDatabase("Exampledb", "scott/tiger", _ ORADB_DEFAULT)The
OraSession.OpenDatabase()method creates theOraDatabaseobject. The method call must specify the database name, the connection string, and a bit flag that represents the database mode. The constantORADB_DEFAULTrepresents the default database mode. When Visual Basic executes this line, a connection is created to the specified database. -
Create a global
OraDynasetobject to manipulate the data.Oracle Objects for OLE lets users browse and update data using an object called a dynaset.
The Employee application needs a global dynaset that the rest of the program can access. The
OraDatabase.CreateDynaset()method creates the dynaset specifying a valid SQLSELECTstatement. In the example, the statement selects all the rows from theemptable and assigns the resulting dynaset to the globalEmpDynasetvariable as follows:Set EmpDynaset = OraDatabase.CreateDynaset("select * from emp", _ ORADYN_DEFAULT)The
CreateDynaset()method returns a pointer to the result of the SQL SELECT statement.The
ORADYN_DEFAULTparameter value specifies the default dynaset state. In the default state, Oracle Objects for OLE sets unset fields toNULLwhile adding records using theAddNewmethod. This behavior is preferable because theemptable has no column defaults defined. You can also specify other options to allow server column defaults when adding records.See Also:
"CreateDynaset Method" -
Refresh the Employee Form with dynaset data.
The Employee Form displays database records one row at a time. Changes to the current row, such as those caused by navigating to a different row, must be reflected on the screen. The
EmpRefresh()subroutine updates fields with the current dynaset row. ForNULLfield values, empty strings are displayed.The following is an example of an
EmpRefresh()subroutine:Private Sub EmpRefresh() 'check if the current dynaset row is valid If EmpDynaset.BOF <> True And EmpDynaset.EOF <> True Then txtEmpno = EmpDynaset.Fields("empno").Value ' we can't display nulls, so display "" for NULL fields If Not IsNull(EmpDynaset.Fields("ename").Value) Then txtEname = EmpDynaset.Fields("ename").Value Else txtEname = "" End If If Not IsNull(EmpDynaset.Fields("job").Value) Then txtJob = EmpDynaset.Fields("job").Value Else txtJob = "" End If 'check if mgr=nul If Not IsNull(EmpDynaset.Fields("mgr").Value) Then txtMgr = EmpDynaset.Fields("mgr").Value Else txtMgr = "" End If If Not IsNull(EmpDynaset.Fields("hiredate").Value) Then txtHireDate = EmpDynaset.Fields("hiredate").Value Else txtHireDate = "" End If If Not IsNull(EmpDynaset.Fields("hiredate").Value) Then txtSal = EmpDynaset.Fields("sal").Value Else txtSal = "" End If 'check if comm=nul If Not IsNull(EmpDynaset.Fields("comm").Value) Then txtComm = EmpDynaset.Fields("comm").Value Else txtComm = "" End If txtDeptno = EmpDynaset.Fields("deptno").Value 'if the current dynaset row is invalid, display nothing Else txtEmpno = "" txtEname = "" txtJob = "" txtMgr = "" txtHireDate = "" txtSal = "" txtComm = "" txtDeptno = "" End If End Sub
Completed Sample Form_Load Procedure
In the employee application described in the previous section, the Form_Load() procedure creates the OIP server, connects to the database, creates a global dynaset, and calls the EmpRefresh function to display the field values on the Employee Form. The following is an example of a Form_Load() procedure:
Private Sub Form_Load()
'OraSession and OraDatabase are global
 Set OraSession = CreateObject("OracleInProcServer.XOraSession")
 Set OraDatabase = OraSession.OpenDatabase("Exampledb", "scott/tiger", 0&)
 Set EmpDynaset = OraDatabase.CreateDynaset("select * from emp", 0&)

 Call EmpRefresh

End Sub
The following variables must be defined globally in EMP_QT.BAS:
Global OraSession As Object
Global OraDatabase As Object
Global EmpDynaset As Object
Programming a Data Entry Form
This section describes the Employee Form in detail and then describes the functions that it uses.
About the Employee Form
The Employee form displays the fields of the database EMP table and has functional buttons that allow the user to browse, add, update, and query records.
Each field corresponds to a column in the database EMP table. The Employee field (ENAME) is the indexed column and is mandatory for each record. The field data types and sizes are defined as follows in the EMP table:
Name                     Null?       Type
-----------------------   ----------  --------------------------
EMPNO                     NOT NULL    NUMBER(4)
ENAME                                 VARCHAR2(10)
JOB                                   VARCHAR2(9)
MGR                                   NUMBER(4)
HIREDATE                              DATE
SAL                                   NUMBER(7,2)
COMM                                  NUMBER(7,2)
DEPTNO                    NOT NULL    NUMBER(2)
The Employee Number (EMPNO) and Department (DEPTNO) columns are NOT NULL, and, therefore, always require a value when a record is added. The length of each field is enforced by setting the MaxLength property of each TextBox to the appropriate number.
Figure 6-3 shows the Employee Form.
The initial code for the actual Form_Load procedure is provided in "Completed Sample Form_Load Procedure".
The Employee form is initialized by the Form_Load() procedure and includes the following features:
Navigating Through Data
Database applications typically require that the user be able to view data in the database. The Employee form has four buttons that let the user scroll through data. Table 6-1 lists the buttons, what they do, which dynaset move method enables the action of the button, and where to look for further information.
Table 6-1 Navigational Buttons and Dynaset Move Methods
| Button | Action | Method | See... |
|---|---|---|---|
|
|
Moves to the first record |
|
|
|
|
Moves to the previous record |
|
|
|
|
Moves to the next record |
|
|
|
|
Moves to the last record |
|
To enable navigation through the records of the Employee database, you must first create a global dynaset that selects all the records (rows). Then use the dynaset move methods to program the navigation buttons.
Moving to First or Last Rows
To enable a move to the first row of a dynaset, use the MoveFirst method. Then call the EmpRefresh() routine to refresh the data in the Employee form.
The following example code shows the first-click event procedure for the employee example:
Private Sub cmdFirst_Click()
 EmpDynaset.MoveFirst
 Call EmpRefresh

End Sub
For a move to the last row, use the MoveLast method. Then, call the EmpRefresh() routine to refresh the data in the Employee form.
The following example code shows the last-click event procedure for the employee example:
Private Sub cmdLast_Click()

 EmpDynaset.MoveLast
 Call EmpRefresh

End Sub
Moving to the Previous Row
Navigation is possible to any row of a dynaset. If a user is positioned in the middle of a dynaset (that is, the current row is not the first row), the MovePrevious method enables navigation to the previous row.
However, when a user is positioned on the first row (current row is the first row) and executes the MovePrevious method, the beginning-of-file (BOF) condition becomes TRUE and the current row becomes invalid. In this case, the current row must be reset to the first row using the MoveFirst method.
The following example code shows the click-event procedure for the Previous button:
Private Sub cmdPrevious_Click()

 If EmpDynaset.BOF <> True Then
  EmpDynaset.DbMovePrevious
  If EmpDynaset.BOF = True Then
   MsgBox WarnFirstEmp$
   EmpDynaset.DbMoveFirst
  End If
 End If
Moving to the Next Row
If a user is positioned in the middle of a dynaset (that is, the current row is not the last row), the MoveNext method enables navigation to the next row.
However, when a user is positioned on the last row (current row is the last row) and then executes MoveNext, the end-of-file condition (EOF) becomes TRUE and the current row becomes invalid. In this case, the current row must be reset to the last row using the MoveLast method.
The following example code shows the click-event procedure for the Next button:
Private Sub cmdNext_Click()

 If EmpDynaset.EOF <> True Then
  EmpDynaset.DbMoveNext
  If EmpDynaset.EOF = True Then
   MsgBox WarnLastEmp$
   EmpDynaset.DbMoveLast
  End If
 End If
Adding Records
In the example application, the following buttons allow users to add employee records to the database:
-
Add
-
Commit
To add a record, the user clicks on the Add button, enters the new fields in the text boxes, and then clicks the Commit button to save the data to the database.
Coding the Add Button
The Add event procedure must perform the following steps:
-
Clear the fields on the form.
-
Disable the Add button.
-
Enable the Commit button.
-
Let the user enter new field values.
The following example code shows the Add event procedure for the Add button:
Private Sub AddNew_Click()
'Blank out the fields
  txtEmpno = ""
  txtEname = ""
  txtJob = ""
  txtMgr = ""
  txtHireDate = ""
  txtSal = ""
  txtComm = ""
  txtDeptno = ""

'Disable the Add button and enable the commit button
  AddNew.Enabled = False
  Commit.Enabled = True
'Disable the navigation buttons
  DisableNavButtons
'Set doadd to true for commit procedure
  DoAdd = True
End Sub
When the AddNew_Click() method exits, control returns to the Employee Form where the user enters values in the fields.
Coding the Commit Button (Add)
To commit an addition, you must place the dynaset in add mode using the AddNew method. Then, you assign the new data to the dynaset fields and update the database using the Update method. To make the program robust, the software validates some fields before adding them to the database.
The Commit_Click() event procedure for adding records must do the following:
-
Check that the Employee Number and Department fields are not null.
-
Check that the new Employee Number is not a duplicate entry.
Steps 1 and 2 are performed by the
DoValidationChecks()function which is described following theCommit_Click(). -
Place the dynaset in add mode using the
AddNewmethod. -
Assign entered data to dynaset fields using the
Fields().Valueproperty. This step is performed by theUpdateDynasetFieldsfunction. -
Update the database with new records, using the
Updatemethod. -
Disable the Commit button.
-
Enable the Add button.
The code for the Commit function is broken into the following routines:
Commit_Click Event Procedure (Add)
The following is a typical Commit_Click() event procedure for adding records:
Private Sub Commit_Click()

On Error GoTo err_commit

ErrMsg = ""
'Do validation checks on entered data
If DoValidationChecks Then 'If validation checks have passed

'Add the new record to dynaset
EmpDynaset.AddNew

'Update the dynaset fields and then update database if there is no error.
If UpdateDynasetFields Then

'Update the database
  EmpDynaset.Update

Commit.Enabled = False
AddNew.Enabled = True

Exit Sub

err_commit:
    If ErrMsg <> "" Then
        MsgBox ErrMsg
    Else
        MsgBox Error$
    End If

End Sub
DoValidationChecks( ) Function
To check for duplicate entries as suggested in Step 2, you must create a local dynaset with the NOCACHE option, using a SQL statement that counts the rows matching the entered Employee Number field. If a match is found (row count greater than 0), the entered employee number is a duplicate entry and an error is displayed. In this case, because the SQL SELECT statement returns only a number, creating the dynaset without a cache is a more efficient error check than the server finding a duplicate entery.
DoValidationChecks() returns True if the entered data is valid; otherwise, it returns False.
Function DoValidationChecks() As Boolean

Dim DupDyn As Object
Dim DupDynQry As String

On Error GoTo err_ValidationCheck

ErrMsg = ""
'Empno cannot be changed while in Update mode, so we can skip over validation
If DoAdd Then
    If txtEmpno = "" Then
        ErrMsg = "You must enter a value for Employee Number"
        Error 1
    End If
End If

If txtHireDate <> "" And Not IsDate(txtHireDate) Then
    ErrMsg = "Enter date as dd-mmm-yy."
    Error 2
End If

If txtDeptno = "" Then
    ErrMsg = "You must enter a value for Department Number"
    Error 3
End If

'If adding a record, check for Duplicate empno value by
'attempting to count rows with same value
'Build Query:
If DoAdd Then
    DupDynQry = "select count(*) from emp where empno = " & txtEmpno
    Set DupDyn = OraDatabase.CreateDynaset(DupDynQry, ORADYN_NOCACHE)

    If DupDyn.Fields(0).Value <> 0 Then
        ErrNum = DUPLICATE_KEY
        ErrMsg = "Employee Number already exists."
        Error ErrNum
    End If
End If
'Succesful validation with no errors returns True
DoValidationChecks = True
Exit Function

err_ValidationCheck:
    If ErrMsg <> "" Then
        MsgBox ErrMsg
    Else
        MsgBox Error$
    End If
    'Validation returns false on failure
    DoValidationChecks = False

End Function
UpdateDynasetFields( ) Function
The commit event procedure calls this function after putting the dynaset in either Edit or AddNew mode. The UpdateDynasetFields() function sets the dynaset fields to the values entered in the text boxes. The function returns TRUE if successful, or returns FALSE if there is an error.
 Function UpdateDynasetFields() As Integer
'This function sets the dynaset field value to those entered in the text boxes.
'The function returns true on success, false on error.

ErrMsg = ""

On Error GoTo err_updatedynasetfields

EmpDynaset.Fields("empno").Value = txtEmpno
EmpDynaset.Fields("ename").Value = txtEname
EmpDynaset.Fields("job").Value = txtJob
EmpDynaset.Fields("mgr").Value = txtManager
EmpDynaset.Fields("hiredate").Value = txtHireDate
EmpDynaset.Fields("sal").Value = txtSal
EmpDynaset.Fields("comm").Value = txtComm
EmpDynaset.Fields("deptno").Value = txtDeptno

UpdateDynasetFields = True

Exit Function

err_updatedynasetfields:
    If ErrMsg <> "" Then
        MsgBox ErrMsg
    Else
        MsgBox Error$
    End If
    UpdateDynasetFields = False
Updating Records
To allow users to update existing records in the database, you need to include an Update button in the Employee Form. Users navigate to a particular record, click the Update button, make changes, and then click the Commit button.
While in update mode, the application makes the following restrictions:
-
Users cannot navigate to another record or perform another function.
-
Users cannot change the employee number because this is the primary key.
To program the Update function, write an event procedure for the Update button and modify the Commit procedure so that it handles both updating and adding records.
Coding the Update Button
To code the Update button, disable the Employee Number text box to prevent changes to this field while updating records, because this is a primary key. You must also disable the other buttons to disable other functions, such as navigation, while updating records.
Set the DoUpdate Boolean expression to TRUE, so the commit procedure recognizes the current process as an update operation, not an addition.
The update event procedure must do the following:
-
Disable the Update button.
-
Enable the Commit button.
-
Disable other buttons to disable functions, such as navigation, during the update operation.
-
Disable the Employee Number text box.
-
Set the
DoUpdateflag toTrue. -
Let the user enter changes.
The following example code shows the update event procedure:
Private Sub cmdUpdate_Click()
'Disable the Update button and enable the commit button
  cmdUpdate.Enabled = False
  Commit.Enabled = True
'Disable all other buttons
  DisableNavButtons

  txtEmpno.Enabled = False
  DoUpdate = True
End Sub
The update and add event procedures call the DisableNavButtons() subroutine to disable navigation and other functions during an add or update operation.
Private Sub DisableNavButtons()
'disable all buttons while adding and updating
cmdFirst.Enabled = False
cmdPrevious.Enabled = False
cmdNext.Enabled = False
cmdLast.Enabled = False
cmdFind.Enabled = False
cmdUpdate.Enabled = False
AddNew.Enabled = False

End Sub
Coding the Commit Button to Add and Update Records
The procedure for committing an update operation is similar to committing an add, except that the dynaset is set in edit mode using the Edit method and then the new dynaset values are assigned.
Because the same commit button and the same commit event procedure are used to add and update, two global flags DoAdd and DoUpdate are added to distinguish between adding and updating. The Add and Update click event procedures set these flags.
The Commit event procedure for adding and updating must do the following:
-
Validate entered data using the
DoValidationChecks()function as before. -
Use
AddNewto add records or else useEditfor updates. -
Assign entered data to dynaset fields, using the
Fields().Valueproperty usingUpdateDynasetFields()as before. -
Update database with new records, using
Update. -
Disable the Commit button.
-
Reenable all other functional buttons including the Add and Update buttons.
-
Set the
DoUpdateandDoAddflags toFalse.
The code that changes button and flag states in Steps 5 through 7 is provided in a new subroutine called SetAfterCommitFlags(). This replaces the lines of code that originally enabled Commit and AddNew.
The code for this Commit function is broken into the following routines:
-
"DoValidationChecks( ) Function" (UNKNOWN STEP NUMBER) , also used in the original
Commitfunction -
"UpdateDynasetFields( ) Function", also used in the original
Commitfunction -
"SetAfterCommitFlags() Subroutine Example", which is a new subroutine
Commit_Click( ) Event Procedure Example
The following example shows the Commit_Click Event Procedure.
Private Sub Commit_Click()

On Error GoTo err_commit

ErrMsg = ""
'Do validation checks on entered data
If DoValidationChecks Then 'If validation checks have passed

    'If we are adding a record use AddNew
    If DoAdd = True Then
        EmpDynaset.AddNew
    End If
    'If we are updating a record use Edit
    If DoUpdate = True Then
       EmpDynaset.Edit
    End If
    'Update the dynaset fields and then update database if there is no error.
    If UpdateDynasetFields Then
        EmpDynaset.Update
    End If

    SetAfterCommitFlags

End If 'Endif for DoValidationChecks

Exit Sub

err_commit:
    If ErrMsg <> "" Then
        MsgBox ErrMsg
    Else
        MsgBox Error$
    End If

End Sub
SetAfterCommitFlags() Subroutine Example
The following example shows the SetAfterCommitFlag() Subroutine.
The SetAfterCommitFlags() subroutine is called at the end of the commit event procedure. The SetAfterCommitFlags() subroutine reenables disabled buttons and text boxes and sets the DoUpdate and DoAdd flags to False.
Sub SetAfterCommitFlags()
'disable commit and re-enable add and update buttons
Commit.Enabled = False
AddNew.Enabled = True
cmdUpdate.Enabled = True

'enable the other buttons
cmdFirst.Enabled = True
cmdPrevious.Enabled = True
cmdNext.Enabled = True
cmdLast.Enabled = True
cmdFind.Enabled = True
cmdUpdate.Enabled = True
AddNew.Enabled = True

DoUpdate = False
DoAdd = False

txtEmpno.Enabled = True

End Sub
Deleting Records
Users can delete records by navigating to a particular record and clicking the Delete button. The application prompts the user to verify the deletion, then the application deletes the record using the Delete method. The program then refreshes the screen with the next record or with the previous record if the user deleted the last record in the dynaset.
The following example shows the delete-click event procedure:
Private Sub cmdDelete_Click()
'prompt user
Response = MsgBox("Do you really want to Delete?", vbYesNo + vbExclamation)

If Response = vbYes Then
    EmpDynaset.Delete
    'attempt to move to next record
    EmpDynaset.MoveNext
    If EmpDynaset.EOF Then 'If deleted last record
        EmpDynaset.MovePrevious
    End If
    Call EmpRefresh
End If
End Sub
Querying the Database
The employee application can be configured to allow users to search for particular records in the database. For demonstration purposes, a Find button is included to allow users to query only employee names. At any time, the user can enter the query in the Employee Name field, and click the Find button. The application then displays the result or displays a message if the name cannot be found.
To search for records, the FindFirst method is used. When the find operation succeeds, the record is displayed. If the find fails, a message is displayed. The current row is reset to the first row, because failures cause the dynaset to be BOF (beginning-of-file), effectively making the current row invalid.
The Find_Click() event procedure must do the following:
-
Build a find clause to find the record where the
ENAMEcolumn matches the entered string. -
Execute the find using the
FindFirstmethod. -
Display the record if it is found; if the record was not found, display a message and reset the current row to the first row.
The following example shows a typical find click event procedure:
Private Sub cmdFind_Click()
Dim FindClause As String
Dim SingleQuote As String

ErrMsg = ""
SingleQuote = "'"

On Error GoTo err_find
'build the find clause:
'Can make our query case insensitive by converting the names to upper case
'FindClause = "UPPER(ename) = " & SingleQuote & UCase(txtEname) & SingleQuote
FindClause = "ename = " & SingleQuote & txtEname & SingleQuote

EmpDynaset.DbFindFirst FindClause

If EmpDynaset.NoMatch Then
    MsgBox "Could not find record matching Employee Name " & txtEname
    EmpDynaset.DbMoveFirst
End If

Call EmpRefresh

Exit Sub
Using Batch Insert
A typical command to load the Batch Insert form looks like this:
Private Sub BInsert_Click()
  Load BatchInsert
  BatchInsert.Show
End Sub
See Also:
"Programming a Batch Form"Programming a Batch Form
This section describes the Batch Insert Form and then describes the functions that it uses.
About the Batch Insert Form
The Batch Insert Form allows users to insert rows in a batch operation, that is, to insert more than one record into the database by using only one command. This feature is implemented using parameter arrays and SQL statements.
Table 6-1 shows a typical Batch Insert Form:
Users navigate to the Batch Insert Form by clicking the Batch Insert button on the Employee Form. The Batch Insert Form has a grid that displays the entered data and a row of fields where the user enters each record. To keep the example simple, users are only allowed to enter information into the Employee Number, Employee Name, and Department Number fields.
Users enter records in the fields and click the Add to Grid button. The program displays the entered records in the grid. To insert the entire batch to the database, users click the CommitGrid button.
The Batch Insert Form uses three procedures. The Form_Load() procedure initializes the grid with the column headers. The CmdAddtoGrid_click() procedure copies the entered data from the fields to the grid. The CommitGrid_Click() procedure contains the parameter array and SQL statements used to make the batch insert.
These procedures are described as follows:
Coding the Batch Insert Form_Load( ) Procedure
The following examples show how the Batch Insert Form_Load() procedure sets the column headings for the grid:
Private Sub Form_Load()
Grid1.Enabled = True
CurrRow = 0  'Top row
ReadRow = 0
ReadCol = 0

'Set column headings

Grid1.Row = CurrRow
Grid1.Col = 0
Grid1.Text = "Employee Number"

Grid1.Col = 1
Grid1.Text = "Employee Name"

Grid1.Col = 2
Grid1.Text = "Department Number"

NoOfCols = 3

CurrRow = CurrRow + 1

End Sub
Coding the CmdAddtoGrid( ) Procedure
The CmdAddtoGrid_Click() procedure copies the data entered in the fields to the next empty grid row. The global variable CurrRow always points to the first empty row in the grid.
The following example shows the CmdAddtoGrid_Click():
Private Sub CmdAddtoGrid_Click()

'Update the grid
'Update Empno column
Grid1.Row = CurrRow
Grid1.Col = 0
Grid1.Text = txtEmpno
'Update Ename column
Grid1.Row = CurrRow
Grid1.Col = 1
Grid1.Text = txtEname
'Update Deptno column
Grid1.Row = CurrRow
Grid1.Col = 2
Grid1.Text = txtDeptno

'Increment CurrCol
CurrRow = CurrRow + 1

NoOfRows = CurrRow - 1

End Sub
Coding the CommitGrid_Click( ) Procedure
The CommitGrid_Click() procedure inserts the grid data into the database. To do so, this procedure creates a parameter array object for each column in the EMP table that corresponds to a column in the grid. The OraParameters.AddTable() method defines each parameter array. For example, a parameter array called EMPNO_ARR holds all Employee Number column elements.
After the parameter arrays are defined, the Put_Value method populates them with grid column elements.
To commit the parameter array elements to the database, this procedure uses the CreateSQL() method with a SQL INSERT statement containing the parameter arrays. Because the CreateSQL() method executes the SQL INSERT statement in addition to creating a SQL statement object, all column elements (parameter array elements) are inserted into the EMP table with this one statement.
If an error occurs during a SQL INSERT statement that contains parameter arrays, the SQL statement object is still created with no explicitly raised error. To identify such errors, always check the OraDatabase.LastServerErr and OraDatabase.LastServerErrText properties immediately after executing the CreateSQL method.
The CreateSQL method updates the database directly and has no effect on the dynaset. The EmpDynaset. Refresh method must used to refresh this dynaset so that it reflects the newly inserted records.
The CommitGrid_Click() event procedure must do the following:
-
Define a parameter array for each grid (database) column, using the
AddTablemethod. -
Copy grid column elements into parameter arrays, using the
Put_Valuemethod within a nested loop. -
Create a SQL statement object using the
CreateSQLmethod to insert parameter array elements into theEMPtable. -
Check the
LastServerErrTextandLastServerErrproperties to catch SQL statement execution errors. -
Refresh the global dyanset to reflect newly inserted records, using the
Refreshmethod.
The following example shows a typical cmdCommitGrid_Click() procedure:
Private Sub cmdCommitGrid_Click()
Dim OraSqlStmt As Object
Dim OraPArray(2) As Object

On Error GoTo err_CommitGrid
ErrMsg = ""

'Define parameter arrays, one for each column
OraDatabase.Parameters.AddTable "EMPNO_ARR", ORAPARM_INPUT, ORATYPE_NUMBER, _
            NoOfRows
OraDatabase.Parameters.AddTable "ENAME_ARR", ORAPARM_INPUT, ORATYPE_VARCHAR2, _
            NoOfRows, 10
OraDatabase.Parameters.AddTable "DEPTNO_ARR", ORAPARM_INPUT, ORATYPE_NUMBER, _
            NoOfRows
If OraDatabase.LastServerErr <> 0 Or OraDatabase.LastServerErrText <> "" Then
Error 1
End If

'Initialize local array to hold parameter arrays
Set OraPArray(0) = OraDatabase.Parameters("EMPNO_ARR")
Set OraPArray(1) = OraDatabase.Parameters("ENAME_ARR")
Set OraPArray(2) = OraDatabase.Parameters("DEPTNO_ARR")

'Init the param array variables. Add loop to read thru grid ROWS
For ReadRow = 0 To (NoOfRows - 1)
Grid1.Row = ReadRow + 1
'Loop to read thru grid CELLS
    For ReadCol = 0 To NoOfCols - 1
        Grid1.Col = ReadCol
        OraPArray(ReadCol).Put_Value Grid1.Text, ReadRow
    Next ReadCol
Next ReadRow

'create a sqlstmt to insert array values into table
Set OraSqlStmt = OraDatabase.CreateSql("insert into emp(empno,ename,deptno)" & _
        "values(:EMPNO_ARR,:ENAME_ARR,:DEPTNO_ARR)", 0&)
If OraDatabase.LastServerErr <> 0 Or OraDatabase.LastServerErrText <> "" Then
  ErrMsg = OraDatabase.LastServerErrText
  Error 1
End If

'Refresh the Dynaset
EmpDynaset.Refresh

OraDatabase.Parameters.Remove "EMPNO_ARR"
OraDatabase.Parameters.Remove "ENAME_ARR"
OraDatabase.Parameters.Remove "DEPTNO_ARR"

Exit Sub

err_CommitGrid:
    If ErrMsg <> "" Then
        MsgBox ErrMsg
    Else
        MsgBox Error$
    End If

End Sub